Tuesday, December 1, 2015

Felt Ball Ornaments

HAPPY DECEMBER FRIENDS!!! I'm just a little bit excited for my most favorite time of the year.  And to kick off this spectacular month, I'm sharing the first a few fun ornament DIY ideas.  This one could not be more simple or less time consuming.  It'll take you longer to get the supplies than to assemble. Sound like your kind of craft? Awesome. Let's get started.
Take your clear sphere ornaments, mine are plastic from Hobby Lobby because my toddler still plays with our tree....better safe than sorry. 
Pop off the tops of those ornaments and pop in some mini felt balls. Then pop the top back on and if you're feeling extra crafty, tie some ribbon to the top. I love the contrast of the black and white stripes to the colorful balls.
That's it.  You're done. And look how adorable it looks!  Happy Decorating!

Friday, November 27, 2015

The Best Kind of Books

I'm not a big reader compared to some people...I love a great book every now and then but one genre of book I can ALWAYS get into?  Craft. Duh.  I recently got sent 2 books that spoke to my soul.
 The first was Washi Tape Crafts: 110 Ways to Decorate Just About Anything by Amy Anderson.  Amy is from washi tape crafts blog, & Mod Podge Rocks Blog, so I already know this was going to be good.  It comes built in with 10 rolls of washi tape so you can get crafting right away.
It's full of new ideas you haven't seen on other blogs or images not actually linked on Pinterest.  This has step-by-steps of projects that are big to little and all easy to do for even beginners. 
I was also sooooo excited about The Complete Book of Chalk Lettering: Create and Develop Your Own Style by Valerie McKeehan.  You know those gorgeous chalkboards from Lily & Val..
That's Valerie! This book is full of gorgeous instructions, useful information & even built in chalkboards to help you learn all about chalk art.  

So many fonts & chalkboard designs to recreate...I'm in love. These are 2 books that you definitely need to add to your Christmas list...or just wrap them up for yourself from "Santa"! 

Thursday, November 26, 2015

Happy Thanksgiving, friends!  I hope you're all able to talk to or spend time with those you love.  Today I'm thankful for YOU!  Thank you for visiting this little blog of mine and helping me be able to continue sharing my creations with you!

Wednesday, November 25, 2015

Be Merry Printable

Here's a printable to help your get decorated for Christmas since Thanksgiving is almost here & it will finally be acceptable to go full-blown holiday festive!  Download below as a 5x7 or an 8x10.  (for personal use only please)

Monday, November 23, 2015

Nutcracker Placecards

Last week when I shared a post about making your holiday dinner parties easier, putting together the table settings may have been my favorite part!
The tablecloth was made from some buffalo check print fabric that I stumbled on at Walmart by some miracle.  I only regret not getting more of it!
Clear plates, gold dipped silverware & emerald green napkins set the perfect background for the adorable place cards I used!

These little wooden nutcrackers came in a set of 6 from Hobby Lobby.  I purchased them FOREVER ago because as soon as I saw them I knew I could use them for so many things. 
I spray painted them white and cut some plaid paper about 1 1/2" thick to fit on their legs.  After writing the names, I used some glue tape to secure the paper and then trimmed in the triangle end.  While your guests are eating, the nutcrackers can stand guard by their drinks. 

Friday, November 20, 2015

My Advent Calendar

Here is everything you ever wanted to, and maybe never wanted to know about how I do out advent calendar. So over the past few years, I've shared a few shots of my advent calendar on social media. And this year I'm finally on top of my game enough to share this in time for you to make & enjoy your own!
A few years ago, I stumbled upon this image on Pinterest, and for the life of me, I could not find any actual post with this picture in it. After the search consumed me, (for like a few days), I gave up and just went right to work making my own.  This year I finally had to replace the bag after loosing & the accidental wrinkling of a few over the years required new ones. (I apologize for the lighting, hallways don't provide for the best natural lighting.)


I started with a roll of kraft paper (from the dollar store), white paper bags, and mini clothespins.  I used my cricut to cut out the numbers in kraft paper & glues onto the bag.  Measure & mark your kraft paper then hot glue the clothes pins on.  Keep in mind you'll need enough room vertically and horizontally. I hung mine by gluing a long skinny dowel to the top of the paper & then tying bakers twine on either end.
So now that the hard part is over, let's talking about the fun stuff! The fillings.  Keep in mind I only have 1 chid, so for some items I only have to buy one of.  I stock up on small crafts, treats, books, coloring books, and as well factor in activities like looking at lights or going to a christmas party. 
For those days or other things like "popcorn & a Christmas movie" I just slip in a cute card with instructions.  Be sure to make a sheet of everyday's item, so you can keep your sanity and know what day you have to mentally prepare to make cookies with a toddler.
Great places to look are obviously the dollar store, but Michaels and Hobby Lobby also has lots of little craft kits that you can buy for around a dollar as well. 
For things that don't fit in the bags, I again slip a note inside and wrap up the item and store in a closet.  Or if you're kids are older, you could give them a clue where you hid the item!
Here are a few items that are in our advent calendar every year:
-Christmas Jammies
-a Family ornament
-Go look at lights
-Watch a christmas movie
-Decorate cookies
-Make & send a Christmas card
-The Night Before Christmas book
-Read the story of Christ's birth
And my last and final tip, is to remember every day doesn't need something big.  After gathering items, if I ever find myself missing a few days, I pop in a small treat like a piece of chocolate or a candy cane.  Because it's still festive & kids love candy!

Thursday, November 19, 2015

Feather Christmas Wreath

I have a photo saved in the depths of my phone albums of a feathery wreath amongst gorgeous Christmas decor.  I loved it so much it was one of the things I was so excited to make this year!
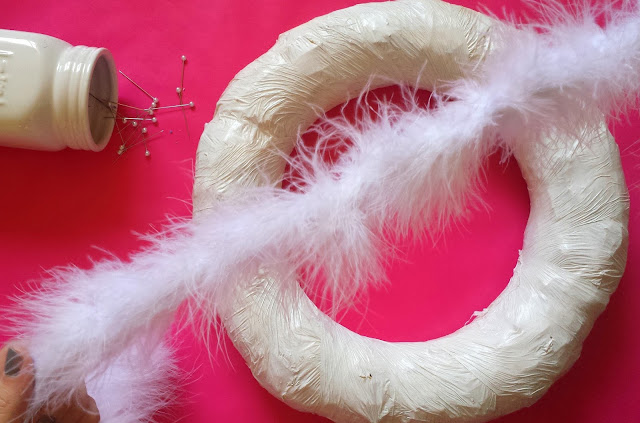
I re-used an old wreath form and just gave it a coat of white spray paint so nothing peaks through.
For the feathers I grabbed some of these feathers from the Christmas craft section at Hobby Lobby.  It was cheaper than buy 3 or 4 boas large & were the exact same thing...they're like mini boas!
Using floral pins, pin in one end, then wrap around & pin the end.  Repeat!  I used 6 of the mini-boas.


Add a little bit of this amazing plaid ribbon (Target dollar spot for the win again!), hang up and then marvel in the gorgeous-ness of your feather Christmas wreath.