Showing posts with label DIY. Show all posts

Monday, December 14, 2015

Confetti Bottles for Neighbor Gifts


MORE CONFETTI! Because if there was ever a time to overuse confetti, it's during the holidays!  I love this idea because you can also use it for New Years neighbor gifts. So gather the supplies...
Remove the top paper of the bottled drink of your choice, then coat the bottom in glue & sprinkle, roll & press on that confetti. Be sure to shake off any extra.
 Start by tying on knot with your fabric ribbon.  Then string on 2 bells of different sizes onto bakers twine and loosely knot around the ribbon.
Slip your choice of tag onto the ribbon and tie into bow.
Ta-Da! A festive & fancy neighbor gift. 
(Just beware of shedding confetti & grab from the neck of the bottle.) 


Thursday, December 10, 2015

Teacher & Aide Christmas Gifts

I love to give gifts and I believe the best kind of gifts involve sweets! For our Christmas gifts for my son's teachers, aides & bus drivers I decided to make some of those awesome "candy-sampler" boxes. 
I picked up some bead boxes from Michaels and grabbed packs of candy from the dollar store & Target then started filling them up! Here are some candy I included:
-vanilla caramels-forrer roche- mini candy canes-russell stover chocolates-peach rings-cinnamon bears-swedish fish-chocolate covered cherries-peppermint almond roca-andes mints-chocolate covered pretzels-chcolate snowmen-junior mints-peppermint marshmallows-whoopers-chocolate covered graham cracker
Wrap with fabric ribbon, twine & tie on a tag.  So easy, so fun, and so impressive! And they totally loved them! 

Tuesday, December 8, 2015

Confetti Ornament

I promised you there'd be more ornament DIYs coming atcha, and I'm not one to tell a lie!  Equally fun and almost as easy as the felt ball ornaments, these confetti "dipped" ornaments are just the thing your Christmas tree never knew it was missing.

After gathering your supplies, try your best to tape off a straight line around your ornament (mine are white porcelain from Hobby Lobby) and paint the bottom half with glue. Then shake, press or roll in the confetti.  Personally I like a mixture of the 3, but it's your ornament, do what you want.
Let it dry and shake off anymore excess and enjoy that awesome party-ready ornament!


Tuesday, December 1, 2015

Felt Ball Ornaments

HAPPY DECEMBER FRIENDS!!! I'm just a little bit excited for my most favorite time of the year.  And to kick off this spectacular month, I'm sharing the first a few fun ornament DIY ideas.  This one could not be more simple or less time consuming.  It'll take you longer to get the supplies than to assemble. Sound like your kind of craft? Awesome. Let's get started.
Take your clear sphere ornaments, mine are plastic from Hobby Lobby because my toddler still plays with our tree....better safe than sorry. 
Pop off the tops of those ornaments and pop in some mini felt balls. Then pop the top back on and if you're feeling extra crafty, tie some ribbon to the top. I love the contrast of the black and white stripes to the colorful balls.
That's it.  You're done. And look how adorable it looks!  Happy Decorating!

Friday, November 20, 2015

My Advent Calendar

Here is everything you ever wanted to, and maybe never wanted to know about how I do out advent calendar. So over the past few years, I've shared a few shots of my advent calendar on social media. And this year I'm finally on top of my game enough to share this in time for you to make & enjoy your own!
A few years ago, I stumbled upon this image on Pinterest, and for the life of me, I could not find any actual post with this picture in it. After the search consumed me, (for like a few days), I gave up and just went right to work making my own.  This year I finally had to replace the bag after loosing & the accidental wrinkling of a few over the years required new ones. (I apologize for the lighting, hallways don't provide for the best natural lighting.)


I started with a roll of kraft paper (from the dollar store), white paper bags, and mini clothespins.  I used my cricut to cut out the numbers in kraft paper & glues onto the bag.  Measure & mark your kraft paper then hot glue the clothes pins on.  Keep in mind you'll need enough room vertically and horizontally. I hung mine by gluing a long skinny dowel to the top of the paper & then tying bakers twine on either end.
So now that the hard part is over, let's talking about the fun stuff! The fillings.  Keep in mind I only have 1 chid, so for some items I only have to buy one of.  I stock up on small crafts, treats, books, coloring books, and as well factor in activities like looking at lights or going to a christmas party. 
For those days or other things like "popcorn & a Christmas movie" I just slip in a cute card with instructions.  Be sure to make a sheet of everyday's item, so you can keep your sanity and know what day you have to mentally prepare to make cookies with a toddler.
Great places to look are obviously the dollar store, but Michaels and Hobby Lobby also has lots of little craft kits that you can buy for around a dollar as well. 
For things that don't fit in the bags, I again slip a note inside and wrap up the item and store in a closet.  Or if you're kids are older, you could give them a clue where you hid the item!
Here are a few items that are in our advent calendar every year:
-Christmas Jammies
-a Family ornament
-Go look at lights
-Watch a christmas movie
-Decorate cookies
-Make & send a Christmas card
-The Night Before Christmas book
-Read the story of Christ's birth
And my last and final tip, is to remember every day doesn't need something big.  After gathering items, if I ever find myself missing a few days, I pop in a small treat like a piece of chocolate or a candy cane.  Because it's still festive & kids love candy!

Thursday, November 19, 2015

Feather Christmas Wreath

I have a photo saved in the depths of my phone albums of a feathery wreath amongst gorgeous Christmas decor.  I loved it so much it was one of the things I was so excited to make this year!
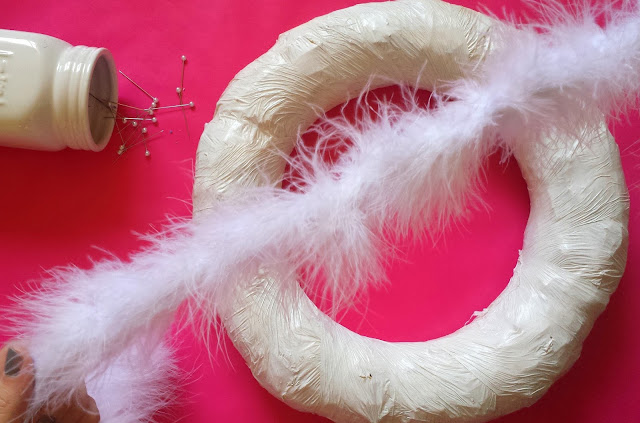
I re-used an old wreath form and just gave it a coat of white spray paint so nothing peaks through.
For the feathers I grabbed some of these feathers from the Christmas craft section at Hobby Lobby.  It was cheaper than buy 3 or 4 boas large & were the exact same thing...they're like mini boas!
Using floral pins, pin in one end, then wrap around & pin the end.  Repeat!  I used 6 of the mini-boas.


Add a little bit of this amazing plaid ribbon (Target dollar spot for the win again!), hang up and then marvel in the gorgeous-ness of your feather Christmas wreath.


Monday, October 26, 2015

Hot Pink Ampersand

This little piece of wall art is the perfect way to brighten up any room & it's easier than you think!
Start with your frame of choice, mine was a thrift store frame I painted white. 
Using freezer paper or vinyl, design and cut your stencil.

Carefully paint filling in your stencil, mine only took one coat. Then remove & let dry.
Without cutting (yet), hot glue a few inches at a time to the back of the frame. After completely attached, trim remaining burlap. Having the extra attached while glueing make it easier to stretch onto the frame.
And you're done! I hung mine up with some Scotch wall hanging velcro attached on the back.